Share One Rainlendar Calendar in a Multi-Boot Linux Environment
Contents
- Introduction
- Step 01 – Download and Install Rainlendar
- Step 02 – Move the Calendar File to a Shared Location
- Step 03 – Modify the rainlendar2.ini File to Point to the Relocated Calendar File
- Backing Up and Propagating Layout, Option, and Position Changes
- Conclusion
Introduction
Rainlendar is hands down, my favorite calendaring app under any operating system. I began using Rainlendar under the Microsoft Windows operating system years ago. When I decided to switch to the Linux operating system full time in 2012, I setup a multi-boot environment so that I could still access a few Windows programs when needed.
I didn’t want to have to manage separate Rainlendar calendars under each operating system that I used, so I did a bit of tinkering and I figured out a way to share one calendar with all installed operating systems. In this tutorial, I’ll detail how to share one Rainlendar calendar in a multi-boot Linux environment, but the steps are similar if you use Microsoft Windows in your multi-boot environment.
Assumptions:
- You’re familiar and comfortable with the procedures for creating a shared data partition.
- You know how to create a menu entry or desktop shortcut, if necessary and desired, to run Rainlendar.
- You have gdebi installed if you are running Debian Linux or a derivative distribution and you opt to use the Rainlendar download for Debian/Ubuntu.
This tutorial is based on Rainlendar Lite v2.15.4.b166.
Step 01 – Download and Install Rainlendar
The first thing you need to do is to head over to the Rainlendar download page and download the appropriate file for your operating system. Currently there are two separate downloads for the Linux environment: one for Debian/Ubuntu, and one for all Other Linux distributions. The download for Other Linux distributions is somewhat a static build, but it does have package dependencies that must currently exist on whatever Linux distribution you’re using. Therefore, you may or may not need to install additional packages and hopefully those packages will be available. I’ve encountered times in the past where required dependency packages were deprecated; i.e. no longer used.
I currently use the download for Other Linux distributions in my multi-boot Linux environment consisting of Debian Stable, Debian Unstable, and Solus. I choose to use the download for Other Linux distributions because I extract the tar.bz2 file into a folder on a shared data partition that is shared among all three distributions; i.e. one install.
If you opt for the Debian/Ubuntu download, after downloading the file drop to the command line and enter the following command:
If you encounter an error message about a missing dependency, you’ll need to install that dependency and then attempt the previous command again. If the Linux distribution you are using no longer offers the dependent package or no longer has the required version of the dependent package, you can try obtaining the required package from the Debian Snapshot Archive. Search under Packages – binary packages on the left side of the main page for the name of the required dependent package.
Note: Do not use a package from the Debian Snapshot Archive if you have a newer version of the required package already installed on your system or if the repository of the Linux distribution you are using contains a newer version. Additionally, using a deprecated package may expose your system to security vulnerabilities. Also understand that if a newer version of a required package does exist, you may not be able to run Rainlendar on the Linux distribution. I have used the Debian Snapshot Archive in the past without issue, but that is no guarantee that you will not encounter an issue.
Rant…come on Rainy (developer’s forum username), give Linux users a true static build or an AppImage build of Rainlendar to preclude having to potentially fiddle with dependencies.
Installation of Rainlendar for Debian/Ubuntu results in the creation of a /usr/lib/rainlendar2 folder containing a number of files and folders (reference screenshot below) as well as the creation of a shortcut under /usr/bin to the rainlendar executable in the /usr/lib/rainlendar2 folder.
If you opt for the Other Linux distributions download, after downloading the file extract it to the folder of your choice. The extraction will result in the creation of a folder named rainlendar2 containing a number of files and folders, including the executable file necessary to run Rainlendar.

Step 02 – Move the Calendar File to a Shared Location
When you run Rainlendar for the first time under Linux, a folder named .rainlendar2 is created under the .config folder of your home folder. The .rainlendar2 folder contains a few initialization files, a log file, a file named Default.ics which is the calendar file, as well as a folder named backups containing backups of the files under the .rainlendar2 folder.

Note: The Default.ics file is not created until you make at least one entry in a calendar or task list.
Using a file manager or the command line, create a folder named rainlendar2 under a shared location. The shared location should be under a shared data partition. Next, again using a file manager or the command line, move the Default.ics file to the rainlendar2 folder.
Step 03 – Modify the rainlendar2.ini File to Point to the Relocated Calendar File
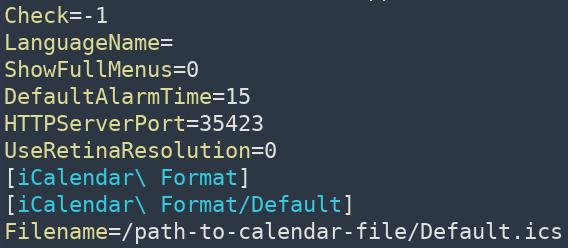
Using your preferred text editor, open the ~/.config/.rainlendar2/rainlendar2.ini file. Search for, or scroll down to locate, the [iCalendar\ Format/Default] heading and change the Filename= value to point to where you moved the Default.ics file in Step 02. Save your changes.
Install Rainlendar for the other Linux distributions under your Linux multi-boot environment and perform this step again.
You do not need to install Rainlendar again if you are sharing the Rainlendar installation with your other Linux distributions. However, you will need to perform this step again for each Linux distribution you are using.
Backing Up and Propagating Layout, Option, and Position Changes
While the following is about backing up and propagating location, option, and position changes among your Linux distributions, you should also create backups as a matter of good computing practice.
When you change the Rainlendar layout, make changes to any of the calendar options, or reposition the calendar desktop elements under one of your Linux distributions, you need to propagate those changes to your other Linux distributions.
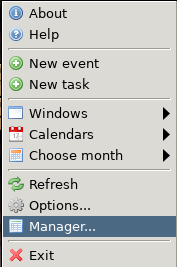
After making a change to your calendar, right-click on the task bar calendar icon or on one of the calendar desktop elements and select Manager.
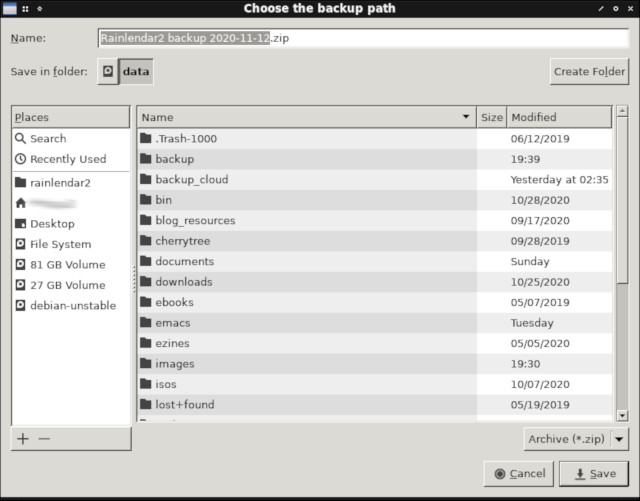
In the Manager window, select File-Backup from the top menu bar.
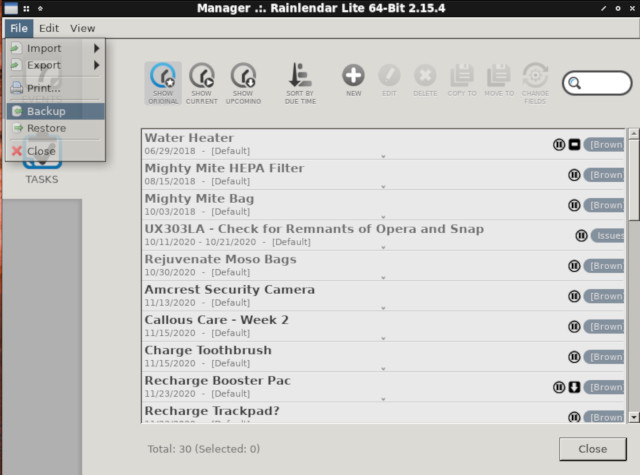
Make any changes to the filename of the Zip compressed backup file to be created and then save the file to a desired location.
When you boot into one of your other Linux distributions, decompress the backup file previously created into an empty folder. Navigate to the ~/.config/.rainlendar2 folder and delete any files to be updated. Then copy the files extracted from the backup file, excluding the calendar file, to the ~/.config/.rainlendar2 folder. Alternately, you can just copy and paste the extracted backup files, excluding the calendar file, to the ~/.config/.rainlendar2 folder, opting to allow overwriting all of the existing files when prompted.
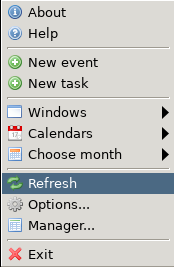
If Rainlendar was running when you performed the previous procedures, you’ll need to refresh the calendar to see the changes. Right-click on the task bar calendar icon or on one of the calendar desktop elements and select Refresh.
I’m not sure what the cause is, but under the Linux distributions I use, the task list doesn’t display when first starting Rainlendar and after refreshing the calendar.
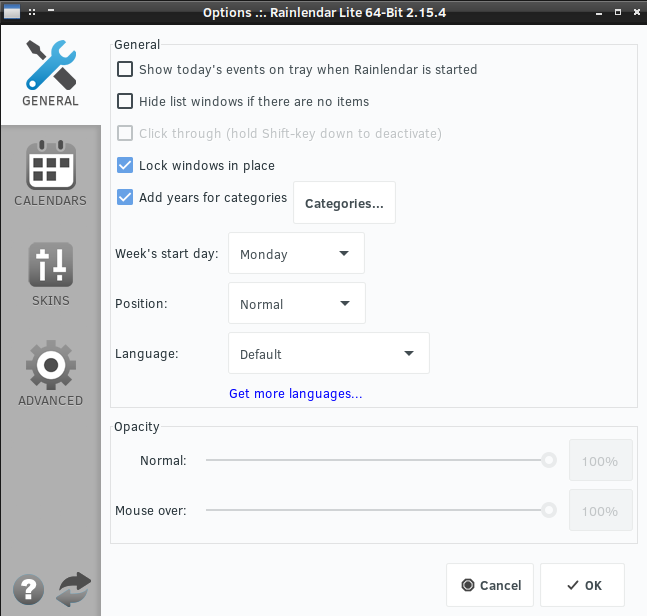
I discovered that selecting Options after right-clicking on the calendar task bar icon or on one of the calender desktop elements…
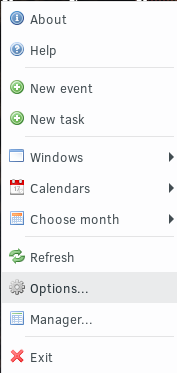
…and then clicking the OK button in the Options window refreshes the calendar desktop elements and the task list then displays.
Conclusion
You now have one shared Rainlendar calendar in your multi-boot environment, saving you the time and the hassle of manually changing multiple calendars. Start using Rainlendar today to better organize your life. If you have a a question or comment, leave it in the Comment box at the bottom of the page.
2020-008


You May Also Like

Manage Personal Medical Costs With GnuCash

Japanese Seasoned Loose Meat Hamburger