Moleskine PIM Hack
Updated on 2024-12-18
Contents
- 01 – Introduction
- 02 – Required Supplies
- 03 – Year View
- 04 – Month View
- 05 – Week View
- 06 – Monthly Budgets
- 07 – Notes
- 08 – Logs
- 09 – Notes Index
- 10 – Tasks
- 11 – ID/Personalize Your Moleskine PIM
- 12 – Additional Notes
01 – Introduction
In 2009 I was searching the Internet for ideas of how to make a paper PIM (personal information manager). I came across a blog post by a Japanese lady named AK, where she detailed how she used a large Moleskine squared hard notebook to make a personal PIM/diary.
Note: The link to AK’s blog post may generate a javascript error window. If so, just click the OK button. The post is old and probably uses outdated javascript code.
One thing that turned me off to using a paper PIM was the difficulty of locating specific notes. I can’t remember exactly how or why, but I came across a post by Joel Lee on the Make Use Of site with tips on making a Moleskine notebook more useful. Three of those tips were: circle to-do lists, organizing note pages by quadrant, and creating an index for notes.
I create my Moleskine PIM for the calendar year. If you’re a student or teacher, you could create your PIM for the school year, starting on August/September, as applicable, and ending with the month prior to the start of the school year.
Some may ask, “Why use a paper planner? I always have my smartphone with me and there are plenty of calendar and planner apps that I can or do use.” Matt Reinstetle wrote a post on The Penny Hoarder site that discusses why some people may prefer a paper planner over a digital planner.
Unlike AK, I do not glue pages together. Yes, writing on the opposite pages does show through, but it’s not enough to bother me. The combination of AK’s Moleskine diary hack, Joel Lee’s tips, and some of my own little tweaks led to the current Moleskine PIM format that I currently use. It takes me many hours to create my Moleskine PIM, but I immensely enjoy using it.
02 – Required Supplies
- Large (5-in x 8.25-in) Moleskine squared hard notebook
- Ruler, preferably one 6-in and one 12-in
- Sharpie fine (0.4mm) felt tip pen, or fineliner pen (0.4mm), black ink, or a Uni-Ball Jetstream RT (1.0mm) ballpoint pen, black ink for drawing lines
- Fineliner pen (0.4mm), red ink or a Uni-Ball Jetstream RT (1.0mm) ballpoint pen, red ink for drawing lines (only if you plan to have monthly budgets)
- Sharpie fine tip black permanent marker (used to ID/personalize the PIM)
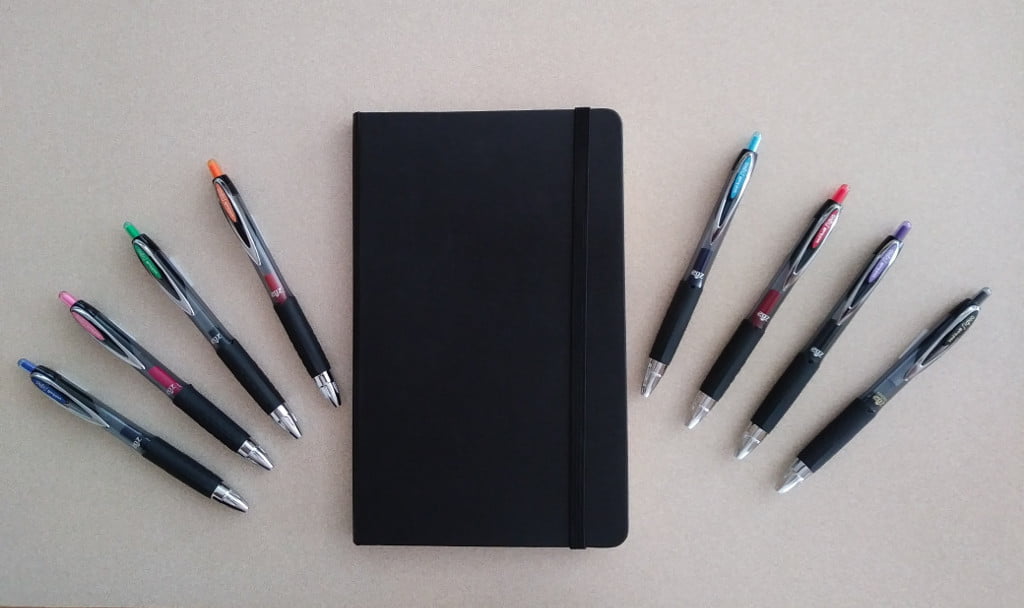
- 8-color set of your preferred ink pens; reference Additional Notes below for what I use
- Favored pen for writing notes and other items; reference Additional Notes below for guidance
- 3M Post-It Tabs, 1-inch, 2 sets, 3 different colors in each set (blue, yellow, red; orange, green, pink)
- Optional: 3M Post-It Tabs, 0.625-inch, 1 set, 4 different colors (blue, green, yellow, red)
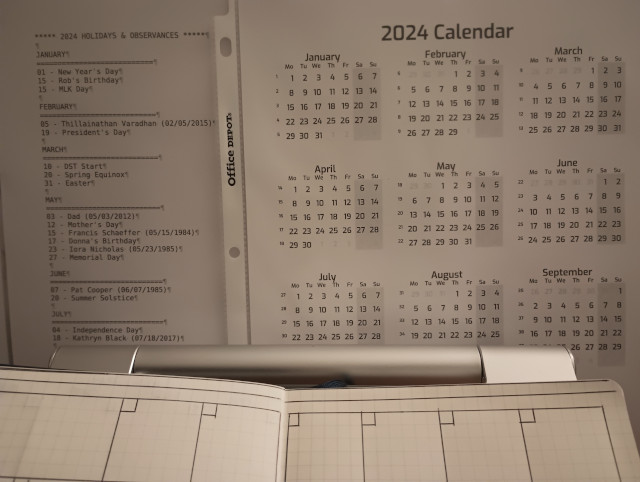
- Yearly calendar printout and a list of holidays and observances (birthdays, memorials, etc.) to use as guides
Moleskine PIM Organization
There are 240 pages in a Moleskine large squared hardback notebook, 238 which are usable. The pages of the notebook for the PIM hack are used as follows:
- 2 pages for the year view
- 24 pages for the month view
- Approximately 104 pages for the week view
- 24 pages for monthly budgets
- Remainder for notes, notes index, and task lists
Ink Color Usage
- Black/dark blue: regular dates in the month view, days of week and date in week view, page numbers on notes, tasks, and index sections
- Gray: memorials
- Green: pay day indicator in month and week views
- Light blue: month and year in month view; month, year, Julian date, and week number in week view; month, year, and column titles for monthly budgets; page titles for notes index and task lists
- Orange: Tasks in month and week views
- Pink: precipitation events in week view
- Purple/violet: non-federal holidays, special dates, etc.
- Red: federal holidays, important notes, tasks, etc.
3M Post-It File Tab Usage
1-inch tabs:
- Yellow: current month in month view
- Blue: current week in week view
- Red: current month in monthly budgets
- Lime green: Notes
- Pink: Notes index
- Orange: Tasks
0.625-inch tabs:
I attach these vertically at the bottom of a page as follows:
- Blue: battery recharge log
- Green: current page of notes being used in the Notes section
- Red: current health vitals log page
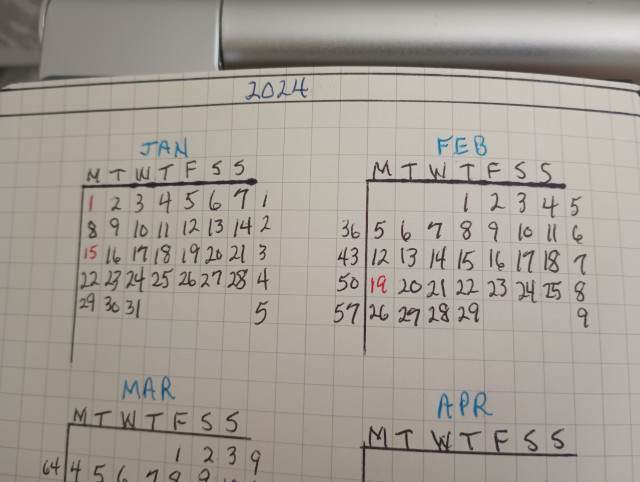
03 – Year View
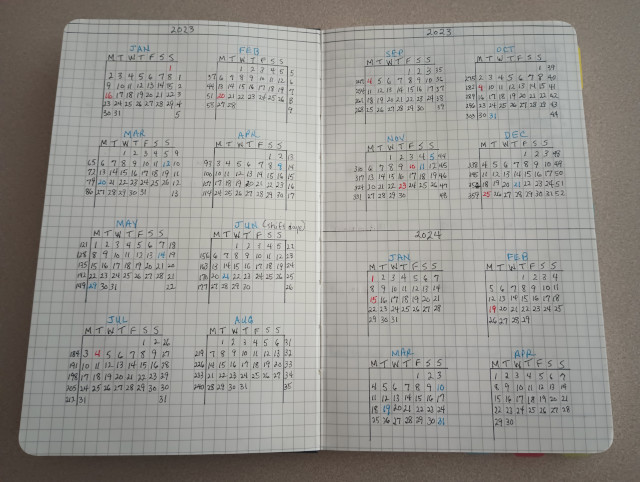
I call it a year view, but it actually contains a year view plus the first four months of the following year. I initially used the year view as an aid in creating the month views. However, I now primarily use the year view to write the Julian date in the month and week views and to determine when a bottle of one of my natural remedies or supplements will be gone for purchase planning purposes.
The numbers to the left of the vertical lines for the month calendars are the Julian date of Monday. The numbers to the right of the month calendars are the week numbers. Dates in red are federal holidays and dates in other colors are other observances; e.g. Easter, DST start and stop, season changes, etc.
04 – Month View
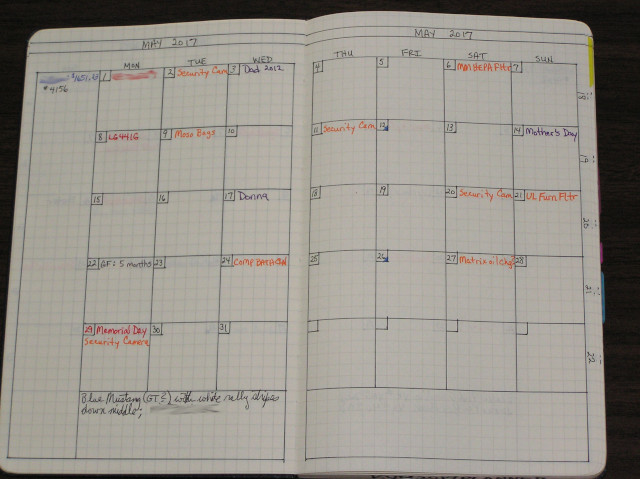
The month view provides a quick overview of appointments, tasks, holidays, etc. You can also use the month view to jot down quick notes, phone numbers, Internet links, etc. Although it can be a bit of a challenge (reference the error I made in the image on the left below), I like to use more of the month view for notes than AK’s original format. The numbers on the right side written sideways are the week numbers and the Julian date on Monday; reference the image on the right below.
 |  |
05 – Week View
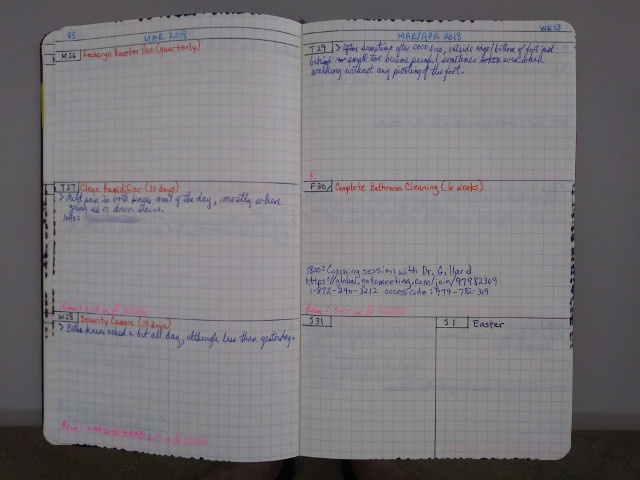
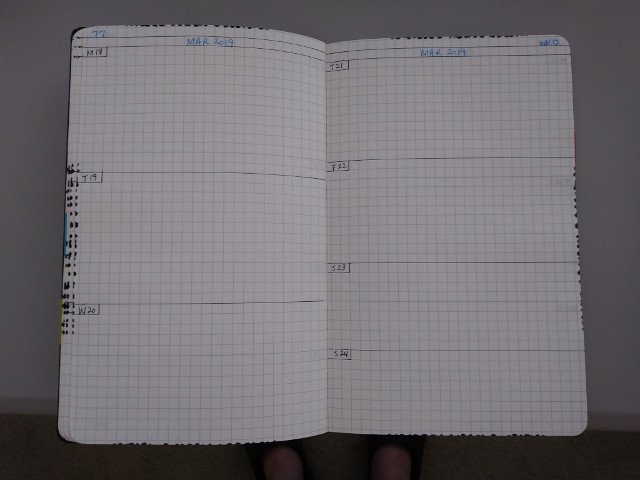
The week view affords more writing area, so you can provide more detail about appointments, special days, etc. I also like to use the week view as somewhat of a journal to jot down health issues, special occurrences, etc. I found myself sometimes needing more space to write things on Saturdays and Sundays, so in 2019 I began using the full width of the page for both days. To accomplish the wider writing area for Saturdays and Sundays, I had to reduce the number of lines for Thursday and Friday; reference the second image below. The number at the top left is the Julian date of Monday and the letters WK and number at the top right is the week number.
 |  |
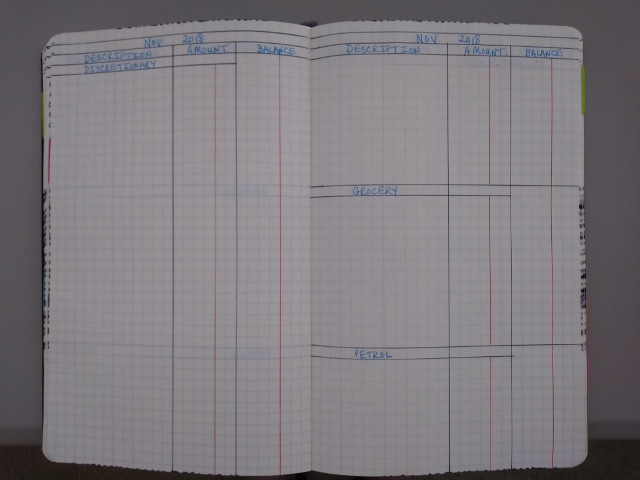
06 – Monthly Budgets
I use monthly budgets in my Moleskine PIM to track discretionary, grocery, and petrol budgets.
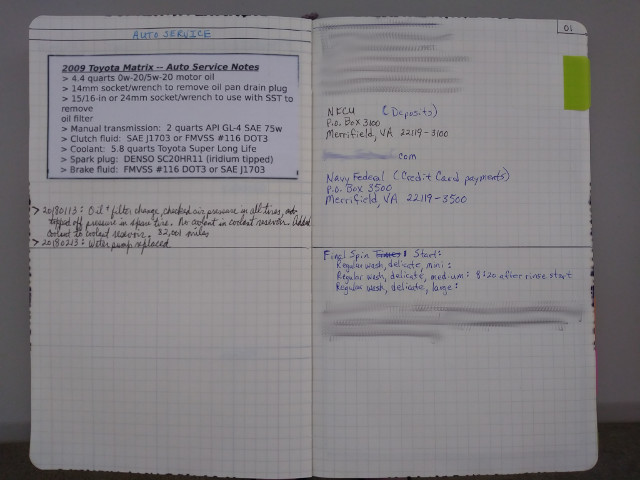
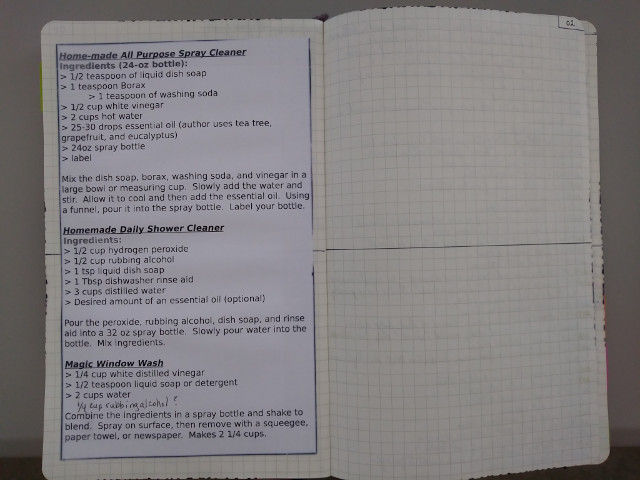
07 – Notes
I don’t write many notes. I usually just write down email addresses I might need, bank mailing addresses, parts information for auto repair maintenance, DIY cleaner recipes, and tasks I complete so that I can quickly locate them rather than writing them down in the week/month view.
If you have recurring notes that you use from year to year, you can create a document using your favored word-processing program, print the document out, and then use a desired method to adhere the printout to one of the Moleskine pages. I’ve found using transparent tape around the edges of the printout to work fine.
 |  |
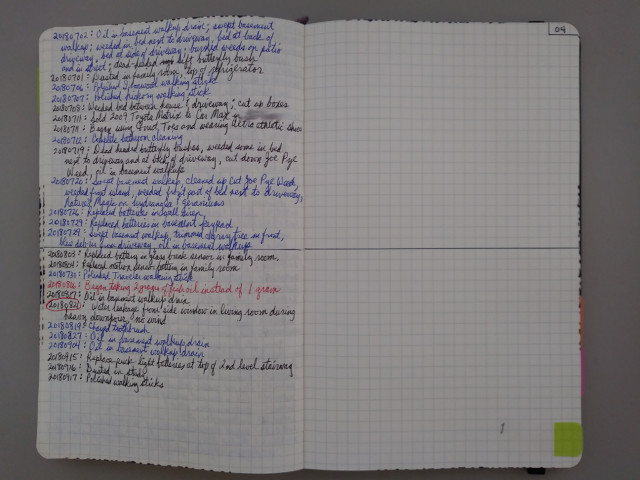 |
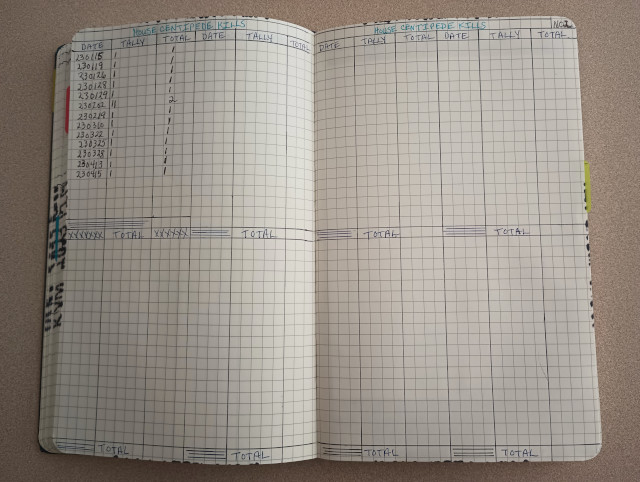
08 – Logs
In 2022, I began keeping logs of house centipede kills, rechargeable battery recharges, and health vitals in the beginning of the Notes section.
 |  |
 |
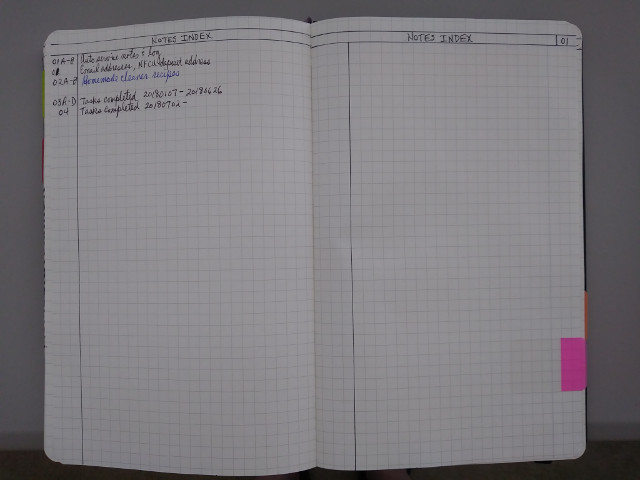
09 – Notes Index
The notes index is used to record the page number and brief description of what is on the page. The notes index enables you to quickly locate specific notes.
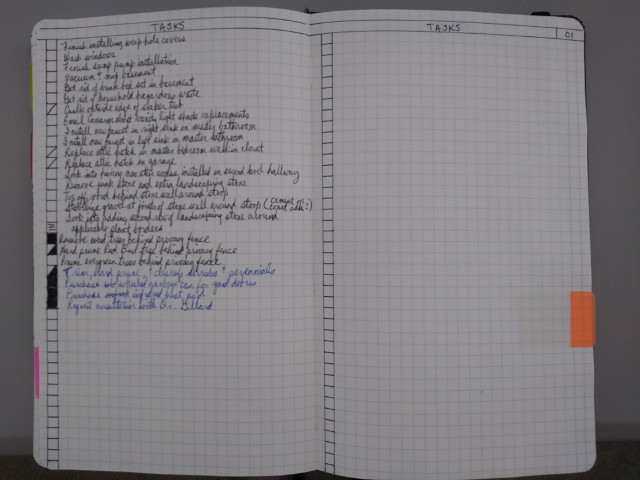
10 – Tasks
I use the tasks area to write down tasks that I need/want to accomplish over the year. However, instead of using Joel Lee’s circle to-do lists technique, I decided to just create a column of checkboxes.
Shading Key:
- Blank — not started
- Diagonal line — started working on task
- Half shaded square — task partially completed
- Full shaded square — task completed
- X — task no longer required or I decided not to do it
- 3 parallel lines — text continuation from previous line
11 – ID/Personalize Your Moleskine PIM
I use a Sharpie fine tip black permanent marker to ID/personalize my Moleskine PIM by writing my initials, the year covered, and the word PIM on the top, bottom and side page edges. The marker bleeds a little bit into the pages, but it’s not bad.
12 – Additional Notes
In 2022, I purchased the Uni-Ball Jetstream Sport 0.7mm ballpoint pen and I was smitten. The Uni-Ball Jetstream is the smoothest writing ballpoint pen I’ve ever used and it doesn’t smear at all. However, I have had some bleed-through issues with the ink. I believe the issue is that I use a hand lotion that has coconut oil and shea butter in it and I think one, or both, of the ingredients is the reason for the ink bleed-through.

I also purchased a 3-pack (red, blue, and black ink) of the Uni-Ball Jetstream RT 1.0mm ballpoint pen just to compare the 0.7mm against the 1.0mm. I prefer using the 0.7mm for writing in my Moleskine PIM. The 1.0mm is nice for writing checks and signing documents though.
I liked the Uni-Ball Jetstream so much that I purchased a few colors of the Uni-Ball Jetstream Color 0.7mm ink pen with the thought of using them as replacements for the Uni-Ball Signo 207 gel pens. Unfortunately, out of the six colors I purchased (blue, green, light blue, orange, purple, and red), only the pens with purple and red ink wrote well. The other colors sometimes stopped writing, the light blue color ink being the worst. The ink in the orange color ink pen was also too light.
Therefore, in 2023 I decided to begin using the Sakura Pigma Micron 05 pen in various colors and the Staedtler Triplus Fineliner pen in light blue (Azur, or Delft Blue) for my colored ink needs when writing in my PIM.
Following are a couple of posts to help guide you in selecting a possible pen candidate for writing in your Moleskine PIM:
- Top 5 Pens — Pen Addict
- What Are the Best Pens for Moleskine Notebooks? — Unsharpen
I originally used Sharpie ultra fine tip permanent markers for drawing lines. However, something about the marker has been changed since I published this post. In early 2023, I began working on my Moleskine PIM for 2024 and using a new Sharpie ultra fine-tip marker resulted in thicker lines and the ink bled through onto adjacent pages. Therefore, I’ve begun using the Sharpie fine felt tip pen with black ink, for drawing lines. I’ve decided to use the Uni-Ball Jetstream RT ballpoint pen with red ink since I only draw red lines in my monthly budgets.
 |  |
I used to create the year view using an online calendar or the calendar app on my smartphone as a guide and then I would refer back to the year view when creating the month and week views. However, that method was tedious and prone to error. I used the prior year Moleskine PIM as a guide for including holidays and observances, but that also was tedious and prone to error. In 2020/2021, I began printing out a yearly calendar with holidays as well as a list of holidays and observances. I use both printouts as guides when creating a new Moleskine PIM.
2018-005


You May Also Like
My First Experience with Oat Beverage…Pleasantly Surprised

Short Bits 2020